We’ve all had that “almost perfect” wig moment: the lace looks great in the bathroom mirror, but under studio lights the hairline shines, the curls wilt by hour three, and the ponytail starts creeping back the second you dance. I’ve styled human hair wigs on sweaty sets, windy rooftops, and humid ballrooms—and the truth is, it’s not about doing more. It’s about doing the right prep, using lightweight products, and building a style with staying power.
Prep the wig on a block head, smooth the cuticle with a controlled blowout, and style in clean sections with heat-protectant and moderate heat. Secure with a wig grip, elastic band, and adhesive only where needed. Finish with lightweight, humidity-resistant products and shine focused on mid-lengths and ends. Pre-style heatless sets for fast look changes.
If you want a camera-proof finish that looks like real hair (and lasts through flash photography and long wear), the steps below break down exactly what I do on set—why the order matters, where people go wrong, and the small tweaks that make the biggest difference.
What prep steps prevent frizz under studio lighting?
Prevention is everything. Frizz happens when the cuticle is raised and moisture moves in and out of the hair strand. Under hot lights, that process accelerates. The goal: clean, fully dry hair with a sealed cuticle and minimal residue.
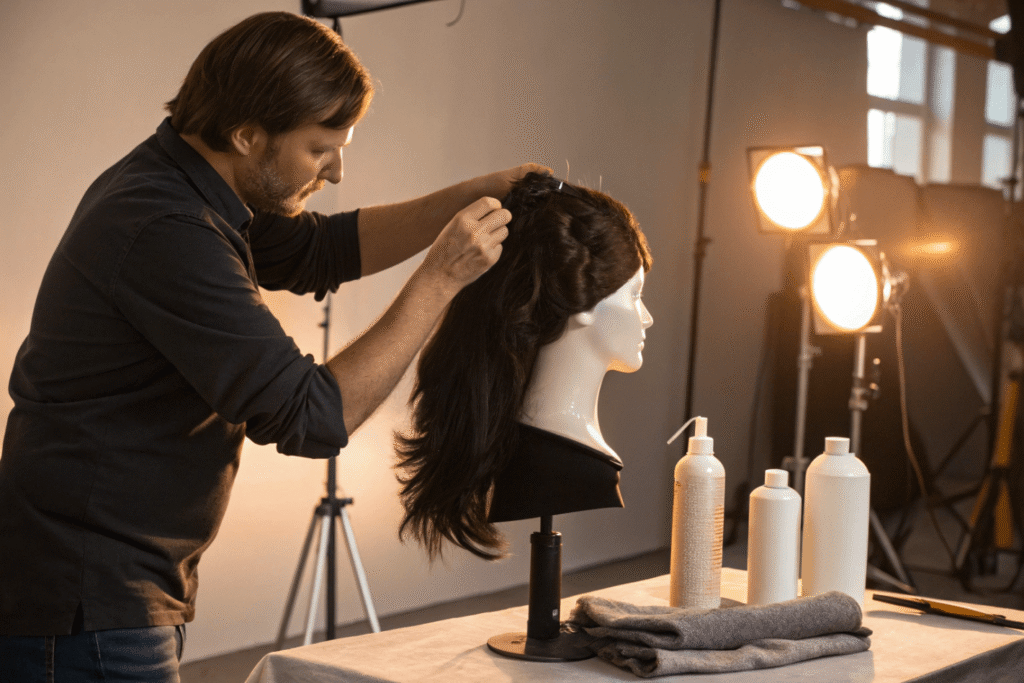
Step 1: Start with a clean, fully dry canvas
- Shampoo with a sulfate-free cleanser to remove product buildup. Rinse thoroughly—residue is a frizz magnet under heat.
- Apply a lightweight, silicone-lite conditioner mid-lengths to ends. Avoid the knots/roots to protect the lace.
- Rinse cool. Towel-blot with a microfiber towel—don’t rub. Air-dry to 80% on a stand.
- Mount on a secure canvas block head. Use T-pins at the ear tabs, nape, and crown so the unit doesn’t shift. Add a wig grip to simulate real wear and keep tension realistic during styling.
Pro tip: I keep a lint roller nearby—tiny fibers on dark hair show up on camera like glitter.
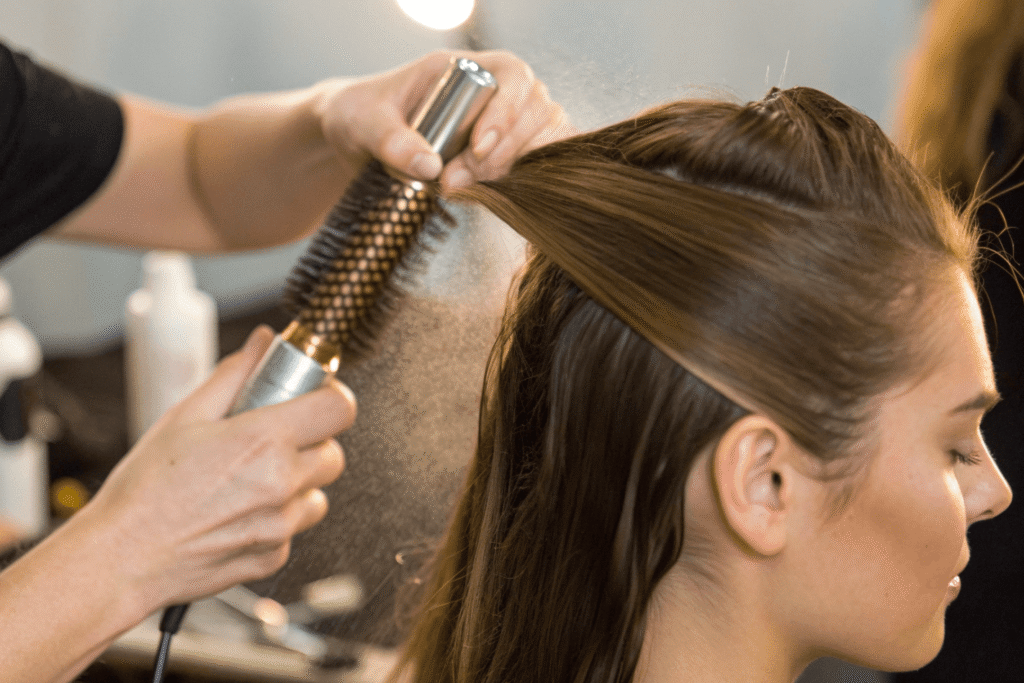
Step 2: Blowout to seal the cuticle and add shine
- Apply a pea-size amount of thermal protectant serum evenly through mid-lengths and ends. Less is more.
- Use a dryer with a concentrator nozzle. Always direct airflow downward along the hair shaft to smooth the cuticle.
- Work in 1–2 inch sections with a ceramic round brush, rolling tension through the ends for a polished bevel.
- Finish each section with a cool-shot pass. That cool air sets the shape and reduces frizz.
Here’s the trick: you’re not just drying—you’re setting the foundation. If I skip a proper blowout, every style after looks fuzzier and collapses faster.
Step 3: De-bulk and control flyaways at the root
- Use a wax stick sparingly at the part and crown; press with an electric hot comb on low-to-medium heat to flatten the “wig hump.”
- Hot comb direction should mimic natural growth—backwards from the hairline and down the part.
- If the lace is shiny under lights, lightly tap with a matte setting mist or lace-specific mattifier.
Step 4: Humidity and heat defense
- Before you curl, mist a humidity-resistant, flexible hold spray through each section and let it dry for 10–15 seconds. This creates a light, invisible scaffold.
- Keep a small anti-frizz serum for touch-ups—dab, don’t smear.
Common mistake: over-oiling. Studio lights exaggerate shine. Heavy oils separate strands and make the hair look piecey and greasy. Keep shine to mid-lengths and ends only.
How do I secure the wig for long wear without tension?
There’s a sweet spot between “locked on” and “tension headache.” The goal: distribute pressure, secure the lace only where needed, and test movement before you leave the chair.
Step 1: Build a stable base
- Prep your natural hair in flat braids or a smooth wrap. Pop on a wig cap that matches your scalp tone.
- Clean skin around the hairline with 70–91% alcohol to remove oils—better adhesion with less glue.
- Put on a velvet wig grip. It adds friction without pulling on your edges and is a game-changer for long days.
Step 2: Place and position the wig
- Set the wig on your head starting from the front hairline; align ear tabs.
- Use the internal elastic band (if included) to create gentle tension—not a vise grip. If your unit doesn’t have one, sew one in; it’s worth it.
- Clip back the hairline to keep lace clean and product-free.
Step 3: Strategic adhesion (only where you need it)
- If you’ll be changing looks or wearing the wig briefly, skip full glue. Use the grip + elastic band + a small amount of tape or adhesive at the temples and center forehead.
- For heavy styles or lots of movement, apply a thin layer of lace adhesive along the hairline in sections. Let it turn tacky, then press lace in with a tail comb.
- Add an elastic melt band over the hairline for 5–10 minutes (cool air helps). This fuses the lace seamlessly without excess glue.
Step 4: Lock points without creating tension
- Cross bobby pins in an X through the wig’s wefts into your braid base or into the wig grip at the occipital bone and above each ear. Don’t pin the lace, pin the structure.
- For updos or high ponytails, add two discreet anchor stitches: thread a curved needle with elastic thread and tack a weft to the wig cap near the nape and crown. Snip out easily later.
Step 5: Movement test
- Shake your head, look up and down, mimic a fast walk or dance. If anything shifts, adjust the elastic band first, then add minimal adhesive to hotspots.
- Zero hotspots = no tension. If you feel pulsing pressure near the temples, loosen and redistribute.
Pro tip: If you tend to sweat, an antiperspirant wipe (forehead only, away from lace) 10 minutes before install can help.

Which finishing products keep shine natural on camera?
Cameras see everything. We want dimension, not glare. Think: lightweight, buildable products with soft, touchable holds.
The product strategy: “diet” over “buffet”
- Start light and layer. You can always add, but removing product on set is a nightmare.
- Keep oils and high-silicone gloss off the roots and lace. They reflect flash and can reveal grids.
Suggested finishing flow
- Light hold working spray to set the shape after brushing out curls or waves.
- Micro-mist shine spray applied 12–16 inches away on mid-lengths and ends only.
- Touch-up anti-frizz serum: pea-size warmed in palms, pressed into ends.
- Hairspray on a spoolie or toothbrush to tame flyaways individually, not the whole head.
Avoid these on camera
- Strong-hold “lacquer” sprays that freeze hair into a plastic shell.
- Powders with silica or SPF at the hairline—flashback risk.
- Heavy pomades near the parting; they clump and catch light.
Finishing table: Common mistakes vs. how to avoid them
| Mistake on Camera | Why It Happens | Quick Fix to Avoid |
|---|---|---|
| Greasy, separated strands | Too much oil/serum | Use a micro-mist shine spray only on mid-lengths/ends; blot excess with tissue |
| Visible lace grid | Shiny lace or wrong tint | Matte lace with a setting mist; use lace tint that matches undertone; avoid silica powders |
| Helmet hair | Overuse of high-hold spray | Switch to flexible, humidity-resistant sprays; layer lightly |
| Frizz halo in backlight | Raised cuticle + humidity | Proper blowout with downward airflow; finish with cool shot and anti-humidity spray |
| Crunchy ends | Spray applied too close | Hold cans 12–16 inches away; build in light passes |
Should I pre-style with heatless methods for faster changes?
Short answer: Absolutely. For multi-look days, heatless sets are your best friend. They reduce thermal fatigue, speed up resets, and give you that “memory” in the hair so it cooperates on command.
When heatless methods make sense
- Tight timelines with multiple looks (e.g., e-comm + editorial in one day).
- Delicate hair or color-treated wigs.
- Hot, humid environments where curls fall quickly—heatless sets pin in more staying power.
Heatless options I actually use
- Flexi-rods or perm rods: consistent spirals, overnight or 45–90 minutes under gentle heat bonnet.
- Pin curls: classic Hollywood waves foundation; easy to brush into S-waves.
- Velcro rollers: volume at the crown without hot tools.
- Braids for texture: two Dutch braids for beach waves; four to six for tighter bends.
How to set for speed
- After the blowout, mist a lightweight setting lotion or mousse from mid-lengths to ends and comb through.
- Wrap on rods/rollers in the direction of your first look (e.g., all away from the face for uniform glam).
- Let it fully dry/cool. Do not rush this. Unset hair = immediate droop.
- Store the wig on the block with clips still in; remove at call time, brush out, and you’re camera-ready in minutes.
- To change looks quickly, re-pin selective sections, mist with working spray, and let set while makeup touch-ups happen.
Step-by-step: From clean wig to camera-ready curls
Use this as your on-set blueprint.
Step 1: Clean, dry, and mounted
- Wash and condition as above; air-dry to 80%.
- Mount on a block head with T-pins; add wig grip.
- Detangle from ends upward with a wide-tooth comb.
Step 2: Controlled blowout
- Apply heat protectant and a dime of light serum on ends.
- Blow-dry with nozzle, working in sections, airflow downward.
- Cool-shot each section to set.
Step 3: Curl or wave set
- Confirm your wig is human hair and heat-friendly. Set tools to 300–350°F.
- Create clean sections. For face-framing, curl away from the face.
- Wrap hair evenly on the iron; hold until warm, not smoking. Let curls cool on the barrel for 5–10 seconds.
- Clip each curl to set and fully cool (15–20 minutes). Mist with light hold as they cool.
Step 4: Hairline and part realism
- If needed, pluck sparingly along the hairline for a graduated density—less is more.
- Use a hot comb to define the part and flatten roots.
- Tint lace or add a tiny swipe of concealer under the part to match your scalp tone.
Step 5: Install and secure without tension
- Braid or wrap your hair; add wig cap and wig grip.
- Place wig; adjust elastic band for gentle tension.
- Adhesive at key points if needed; melt band for 5–10 minutes.
- Cross-pin at wefts above the ears and occipital bone.
Step 6: Brush-out and sculpt
- Remove pins. Brush through curls with a paddle or wide-tooth comb until they marry into shape—don’t panic if it looks fluffy mid-brush.
- For Hollywood waves, pinch ridges with duckbill clips, mist, and set for 5 minutes.
Step 7: Finish for camera
- Light, flexible hairspray to lock shape without stiffness.
- Shine mist at mid-lengths and ends only, 12–16 inches away.
- Tame flyaways with a spoolie sprayed with hairspray.
- Matte any shiny lace areas.
Tools and alternatives: build your on-set kit
| Tool/Material | Best Use | Budget-Friendly Alternative |
|---|---|---|
| Canvas block head + T-pins | Stable styling and precision parting | Styrofoam head + extra pins (less stable) |
| Velvet wig grip | No-slip base, reduced tension | Silicone band (more grip, can trap heat) |
| Elastic melt band | Seamless lace “melt” | Wide elastic headband |
| Round brush + dryer with nozzle | Cuticle sealing, shiny blowouts | Paddle brush + dryer (less bend, still smooths) |
| Electric hot comb | Flattening “wig hump,” defining parts | Fine-tooth comb + low-heat flat iron |
| Flexible hold hairspray | Touchable, humidity-resistant hold | Light mousse + micro-mist spray combo |
| Shine mist (fine atomizer) | Natural, non-greasy sheen | Pea-size serum emulsified in hands, pressed into ends |
Advanced tips for set life
- Mix curl sizes for dimension: Alternate 1-inch and 1.25-inch irons through the back for a less “uniform” camera look.
- Backcomb with intention: A single backcomb at the crown (one inch behind the hairline) gives camera-friendly lift without visible teasing.
- Nape matters: For high ponytails or half-up looks, secure the nape with tape/adhesive or an anchor stitch so it doesn’t lift when you look down.
- Lace line cleanup: If glue seeps, roll it away with the back of a tail comb sprayed with 70% alcohol—dab, don’t rub.
- Emergency kit: Mini glue, travel hairspray, spoolie, mini wax stick, blot papers, tail comb, and a couple of duckbill clips. One minute with these can fix almost anything.
Troubleshooting: quick fixes on the fly
- Curls dropping fast: Re-pin the top layer in 4–6 large pin curls, mist lightly, and hit with a cool blow for 60 seconds. Let set while changing wardrobe.
- Flyaways under backlight: Glide a dryer sheet lightly over the surface to cut static; follow with a spoolie + hairspray detail pass.
- Over-shiny roots: Lightly mist a matte setting spray onto a powder puff and tap just the root and lace edge.
- Lace lifting at temples: Dab a rice-grain dot of adhesive on skin, wait tacky, press with comb, melt band for 2 minutes.
- Over-sprayed ends (crunchy): Warm a drop of serum in palms, press and scrunch ends to soften, then re-mist with flexible spray.
After the event: preserving the wig and style
Treat your wig like a long-term investment; post-event care keeps the hair soft and the lace intact.
- Detangle gently from ends to roots with a wide-tooth comb.
- If heavily sprayed, cleanse with a sulfate-free shampoo; focus on mid-lengths/ends and rinse clean.
- Deep condition for 5–10 minutes (avoid knots/roots). Rinse cool.
- Blot dry, then air-dry on a stand. Avoid aggressive heat on wet hair—it’s weakest when wet.
- Once dry, smooth with a cool pass of the dryer and a paddle brush if needed.
- Store on a satin-covered block head to prevent friction and maintain shape. Keep out of direct sun to protect color.
FAQ recap: the four big questions answered
- What prep steps prevent frizz under studio lighting?
- Clean, fully dry hair; round-brush blowout with downward airflow; cool-shot set; wax stick + hot comb at roots; humidity-resistant, flexible hold products.
- How do I secure the wig for long wear without tension?
- Wig cap + velvet grip + internal elastic for gentle tension; minimal adhesive where needed; cross-pins through wefts; melt band; test movement.
- Which finishing products keep shine natural on camera?
- Lightweight serum, flexible hold sprays, micro-mist shine only on mid-lengths/ends, matte lace touch. Avoid heavy oils and silica-based powders at the hairline.
- Should I pre-style with heatless methods for faster changes?
- Yes. Flexi-rods, pin curls, and Velcro rollers create “memory,” reduce heat damage, and let you switch looks quickly with a simple brush-out.